
| 일 | 월 | 화 | 수 | 목 | 금 | 토 |
|---|---|---|---|---|---|---|
| 1 | 2 | 3 | 4 | 5 | 6 | 7 |
| 8 | 9 | 10 | 11 | 12 | 13 | 14 |
| 15 | 16 | 17 | 18 | 19 | 20 | 21 |
| 22 | 23 | 24 | 25 | 26 | 27 | 28 |
| 29 | 30 |
- CANARY
- CI/CD
- operator
- Pulumi
- Kubernetes 인증
- seldon core
- Litmus
- kubernetes operator
- nginx ingress
- opentelemetry
- MLflow
- Kubernetes
- gitops
- 카오스 엔지니어링
- keda
- 오퍼레이터
- tekton
- knative
- xdp
- Continuous Deployment
- serving
- Model Serving
- Argo
- blue/green
- Kopf
- eBPF
- mlops
- opensearch
- Kubeflow
- argocd
- Today
- Total
Kubernetes 이야기
Goldilocks로 VPA 모니터링 하기 본문

Kubernetes에서 Pod에 적절한 Resoruce request/limit 설정은 매우 중요하다. 이러한 문제를 해결하기 위해 VPA를 사용한다.
VPA에 대해서는 아래의 글을 참고한다.
https://kmaster.tistory.com/45
Vertical Pod Autoscaler (VPA)
Kubernetes에서는 3가지의 오토스케일을 사용하여 확장 처리를 할 수 있다. HPA ( Horizontal Pod Autoscaler ) : Pod를 수평적으로 확장한다. 즉, pod의 cpu나 mem 이 임계치 이상 사용하면 pod 개수를 늘리는 것..
kmaster.tistory.com
Goldilocks
VPA를 설정하면 recommed 값이 보인다. 하지만, 개별적으로 각각 조회를 하여야 하기 때문에 전체적인 관리가 용이하지 않다. Goldilocks는 리소스 요청 및 제한의 시작점을 식별하는 데 도움을 주는 유틸리티이다. Goldilocks는 Kubernetes 클러스터에서 리소스 권장 사항을 보기 위한 대시보드를 제공한다.
설치
[설치 전 요구사항]
- kubectl
- VAP 가 설정된 Kubernetes Cluster
- Deployments, DaemonSets, StatefulSets 로 배포된 워크로드
- metrics-server (VPA의 요구사항임)
- golang 1.17+
1. VPA 설치
이번 설치는 Helm Chart로 배포해 보자.
# helm repo add fairwinds-stable https://charts.fairwinds.com/stable
# helm install vpa fairwinds-stable/vpa --namespace vpa --create-namespace
NAME: vpa
LAST DEPLOYED: Sun May 15 17:52:04 2022
NAMESPACE: vpa
STATUS: deployed
REVISION: 1
NOTES:
Congratulations on installing the Vertical Pod Autoscaler!

Components Installed:
  - recommender
  - updater

To verify functionality, you can try running 'helm -n vpa test vpa'
설치 후 생성되는 Pod 정보이다.
# k get all -n vpa
NAME                                  READY   STATUS    RESTARTS   AGE
pod/vpa-recommender-77869fbb6-6hd92   1/1     Running   0          91s
pod/vpa-updater-666d8d657c-k75rv      1/1     Running   0          91s

NAME                              READY   UP-TO-DATE   AVAILABLE   AGE
deployment.apps/vpa-recommender   1/1     1            1           91s
deployment.apps/vpa-updater       1/1     1            1           91s

NAME                                        DESIRED   CURRENT   READY   AGE
replicaset.apps/vpa-recommender-77869fbb6   1         1         1       91s
replicaset.apps/vpa-updater-666d8d657c      1         1         1       91s
2. Metrics-Server 설치
kubectl apply -f https://github.com/kubernetes-sigs/metrics-server/releases/latest/download/components.yaml
3. Goldilocks 설치
# helm repo add fairwinds-stable https://charts.fairwinds.com/stable
# helm install goldilocks --namespace goldilocks --create-namespace fairwinds-stable/goldilocks
NAME: goldilocks
LAST DEPLOYED: Sun May 15 17:56:31 2022
NAMESPACE: goldilocks
STATUS: deployed
REVISION: 1
TEST SUITE: None
NOTES:
1. Get the application URL by running these commands:
  export POD_NAME=$(kubectl get pods --namespace goldilocks -l "app.kubernetes.io/name=goldilocks,app.kubernetes.io/instance=goldilocks,app.kubernetes.io/component=dashboard" -o jsonpath="{.items[0].metadata.name}")
  echo "Visit http://127.0.0.1:8080 to use your application"
  kubectl port-forward $POD_NAME 8080:80
설치된 내역은 아래와 같다.
# k get all -n goldilocks
NAME                                        READY   STATUS    RESTARTS   AGE
pod/goldilocks-controller-fd9d88548-w9x4z   1/1     Running   0          28s
pod/goldilocks-dashboard-658d568b46-74p8j   1/1     Running   0          28s
pod/goldilocks-dashboard-658d568b46-qnrnw   1/1     Running   0          28s

NAME                           TYPE        CLUSTER-IP      EXTERNAL-IP   PORT(S)   AGE
service/goldilocks-dashboard   ClusterIP   10.96.232.111   <none>        80/TCP    28s

NAME                                    READY   UP-TO-DATE   AVAILABLE   AGE
deployment.apps/goldilocks-controller   1/1     1            1           28s
deployment.apps/goldilocks-dashboard    2/2     2            2           28s

NAME                                              DESIRED   CURRENT   READY   AGE
replicaset.apps/goldilocks-controller-fd9d88548   1         1         1       28s
replicaset.apps/goldilocks-dashboard-658d568b46   2         2         2       28s
Goldilocks UI 접속을 위한 ingress를 생성해보자. port-forward나 nodeport로 생성해도 괜찮다.
apiVersion: networking.k8s.io/v1
kind: Ingress
metadata:
  name: goldilocks-ingress
  namespace: goldilocks
  annotations:
    cert-manager.io/cluster-issuer: selfsigned-cluster-issuer
spec:
  rules:
  - host: "goldilocks.192.168.50.16.nip.io"
    http:
      paths:
      - path: /
        pathType: Prefix
        backend:
          service:
            name: goldilocks-dashboard
            port:
              number: 80
  tls:
  - hosts:
    - goldilocks.192.168.50.16.nip.io
    secretName: goldilocks-cert
이제 브라우저에서 호출해 보자.

위의 화면에서도 보이지만, Goldilocks는 특정 Label 이 있는 Namespace의 앱만 조회한다.
# kubectl label ns <NAMESPACE_NAME> goldilocks.fairwinds.com/enabled=true
그럼 이제 test 라는 namespace를 만들어서 vpa를 설정해보자.
# kubectl create ns test
# kubectl label ns test goldilocks.fairwinds.com/enabled=true
cat << EOF | kubectl create -n test -f -
apiVersion: "autoscaling.k8s.io/v1"
kind: VerticalPodAutoscaler
metadata:
name: hamster-vpa
spec:
targetRef:
apiVersion: "apps/v1"
kind: Deployment
name: hamster
resourcePolicy:
containerPolicies:
- containerName: '*'
minAllowed:
cpu: 100m
memory: 50Mi
maxAllowed:
cpu: 1
memory: 500Mi
controlledResources: ["cpu", "memory"]
updatePolicy:
updateMode: "Off"
---
apiVersion: apps/v1
kind: Deployment
metadata:
name: hamster
spec:
selector:
matchLabels:
app: hamster
replicas: 2
template:
metadata:
labels:
app: hamster
spec:
securityContext:
runAsNonRoot: true
runAsUser: 65534 # nobody
containers:
- name: hamster
image: k8s.gcr.io/ubuntu-slim:0.1
resources:
requests:
cpu: 100m
memory: 50Mi
command: ["/bin/sh"]
args:
- "-c"
- "while true; do timeout 0.5s yes >/dev/null; sleep 0.5s; done"
EOF
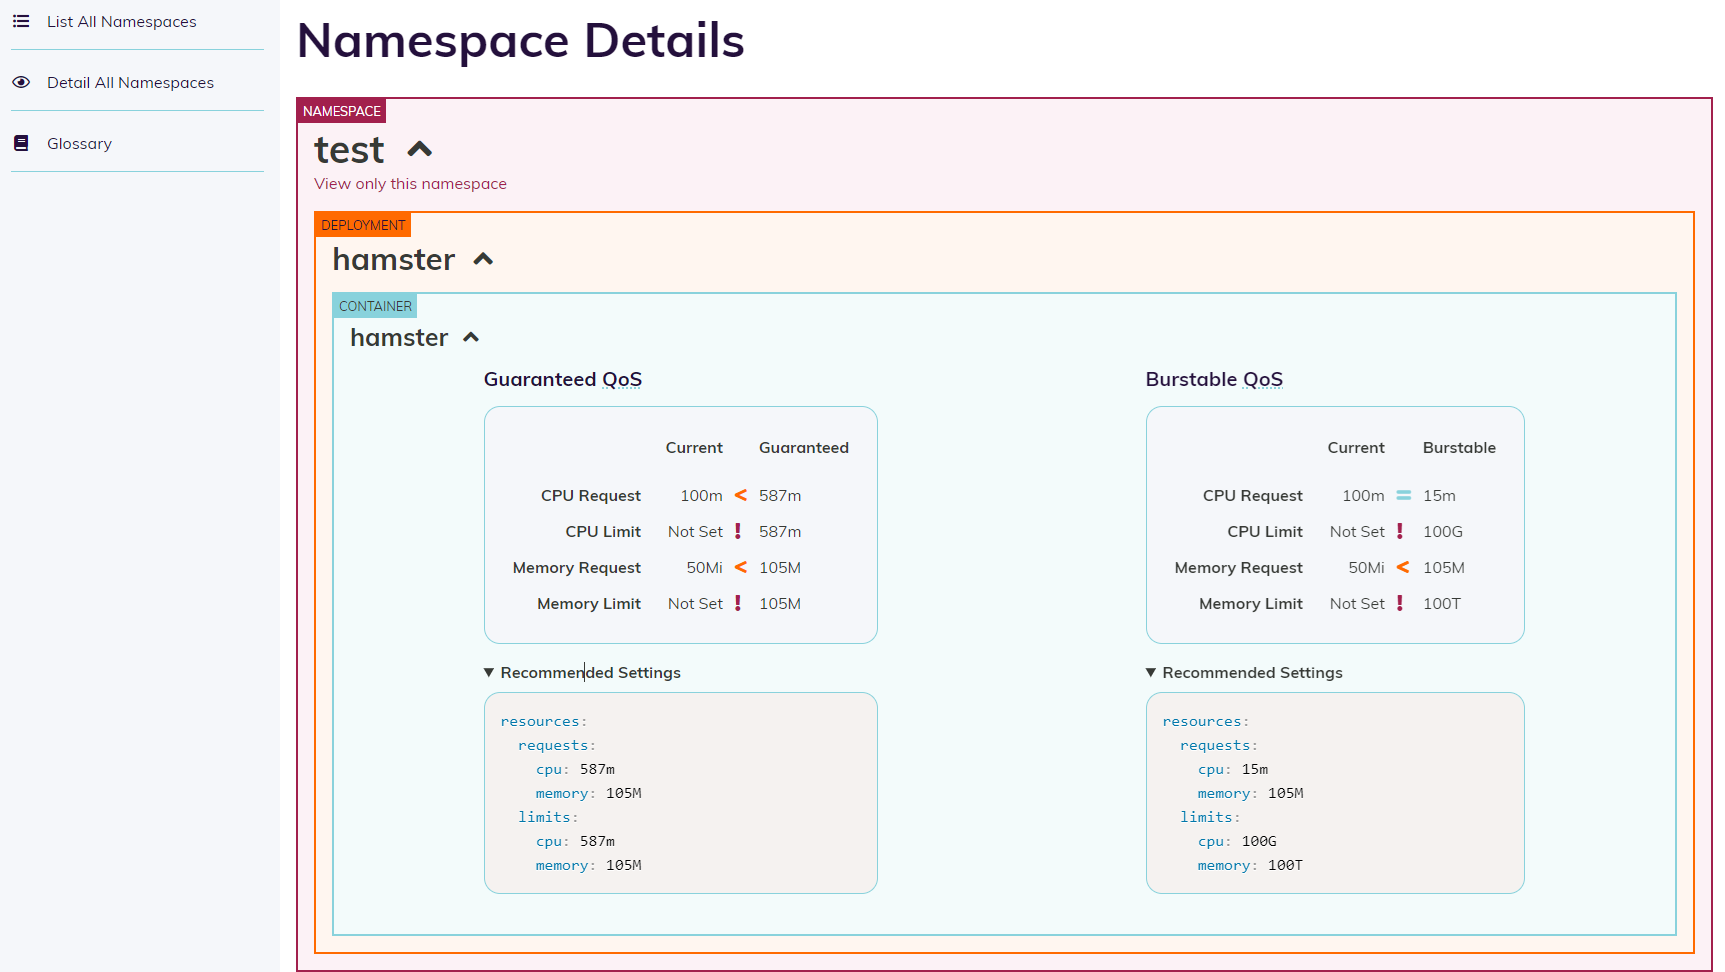
이제 Goldilocks 화면을 다시 조회해 보자.

'Kubernetes > 모니터링' 카테고리의 다른 글
| Cilium - Hubble UI를 이용한 애플리케이션 시각화 (0) | 2022.05.19 |
|---|---|
| kind + cilium + hubble 구성하기 ( without kube-proxy ) (0) | 2022.05.16 |
| Prometheus-operator를 사용하여 Prometheus 및 Grafana 설치 (0) | 2022.05.09 |
| Prometheus에서 주요 alert rule (0) | 2022.05.06 |
| OpenTelemetry (0) | 2022.04.16 |


