
| 일 | 월 | 화 | 수 | 목 | 금 | 토 |
|---|---|---|---|---|---|---|
| 1 | 2 | 3 | 4 | |||
| 5 | 6 | 7 | 8 | 9 | 10 | 11 |
| 12 | 13 | 14 | 15 | 16 | 17 | 18 |
| 19 | 20 | 21 | 22 | 23 | 24 | 25 |
| 26 | 27 | 28 | 29 | 30 | 31 |
- operator
- mlops
- CANARY
- keda
- nginx ingress
- Model Serving
- seldon core
- 오퍼레이터
- MLflow
- kubernetes operator
- blue/green
- gitops
- eBPF
- Kubernetes
- Kubernetes 인증
- Continuous Deployment
- Argo
- CI/CD
- argocd
- knative
- serving
- 카오스 엔지니어링
- Kubeflow
- xdp
- opensearch
- opentelemetry
- Litmus
- Pulumi
- tekton
- Kopf
- Today
- Total
Kubernetes 이야기
Backstage 본문

Backstage 는 Spotify Engineering 팀에서 개발한 개발자 포털 구축을 위한 개방형 플랫폼이다. 중앙 집중식 소프트웨어 카탈로그를 기반으로 하는 Backstage는 마이크로서비스 및 인프라의 순서를 복원하고 제품 팀이 자율성을 손상시키지 않으면서 고품질 코드를 신속하게 제공할 수 있도록 한다.
Backstage는 모든 인프라 도구, 서비스 및 문서를 통합하여 처음부터 끝까지 능률적인 개발 환경을 만든다.
Backstage는 Spotify에서 만들었지만 현재는 인큐베이션 수준 프로젝트로 CNCF(Cloud Native Computing Foundation) 에서 호스팅하고 있다.
기본 제공되는 기능은 다음과 같다.
- 모든 소프트웨어(마이크로서비스, 라이브러리, 데이터 파이프라인, 웹사이트, ML 모델 등)를 관리하기 위한 Backstage 소프트웨어 카탈로그
- 새로운 프로젝트를 신속하게 시작하고 조직의 모범 사례로 도구를 표준화하기 위한 Backstage 소프트웨어 템플릿
- "코드와 같은 문서" 접근 방식을 사용하여 기술 문서를 쉽게 만들고, 유지 관리하고, 찾고, 사용할 수 있도록 하는 Backstage TechDocs
- Backstage의 사용자 정의 가능성과 기능을 더욱 확장하는 오픈 소스 플러그인
- Backstage는 클러스터 관리자가 아닌 서비스 소유자의 요구 사항을 중심으로 설계된 최초의 Kubernetes 모니터링 도구를 제공
Backstage의 데모를 보려면 https://demo.backstage.io/ 로 접속하여 테스트를 해 볼 수 있다.
아키텍처
백스테이지는 세 부분으로 구성되어 있다.
Core : 오픈 소스 프로젝트의 핵심 개발자가 구축한 기본 기능
App : 앱은 배포 및 조정되는 Backstage 앱의 인스턴스다. 앱은 추가 플러그인과 함께 핵심 기능을 연결한다.
Plugin : Backstage 앱을 유용하게 만드는 추가 기능이다. 플러그인은 회사에 고유하거나 오픈 소스 및 재사용이 가능하다. Spotify에는 50개 이상의 팀이 만든 100개 이상의 플러그인이 있다.
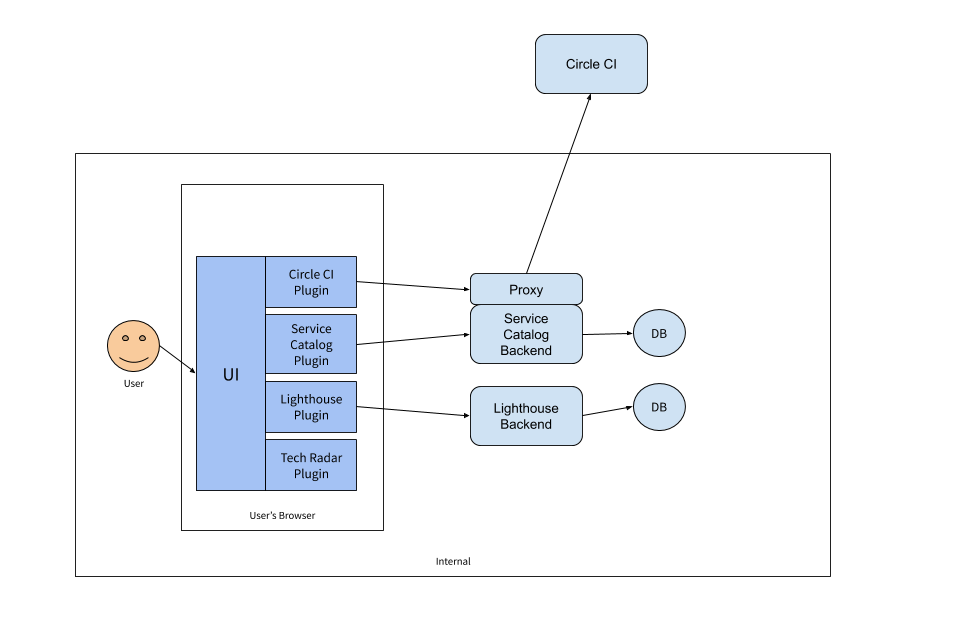
백스테이지는 여러 플러그인으로 구성된다. 다음 그림은 Tech Radar, Lightouse, CircleCI 플러그인으로 구성된 아키텍처 예제이다.
1. 핵심 Backstage UI
2. UI 플러그인 및 지원 서비스
3. 데이터베이스
시작하기
종속성 설치
# Install nvm
curl -o- https://raw.githubusercontent.com/nvm-sh/nvm/v0.39.1/install.sh | bash

# Install node
nvm install 16.17.1

# install yarn
npm install --global yarn

# install docker
sudo yum-config-manager \
    --add-repo \
    https://download.docker.com/linux/centos/docker-ce.repo

sudo yum install docker-ce docker-ce-cli containerd.io docker-compose-plugin
Backstage 앱 만들기
Backstage 독립 실행형 앱을 설치하기 위해 레지스트리에서 직접 노드 실행 파일을 실행하는 도구인 npx를 사용한다.
이 도구는 Node.js 설치의 일부이다. 아래 명령을 실행하면 Backstage가 설치됩니다. 마법사는 현재 작업 디렉토리 내부에 하위 디렉토리를 생성한다.
# npx @backstage/create-app
? Enter a name for the app [required] backstage-app

Creating the app...

 Checking if the directory is available:
  checking      backstage-app ✔

 Creating a temporary app directory:
  creating      temporary directory ✔

 Preparing files:
  copying       .dockerignore ✔
  templating    .eslintrc.js.hbs ✔
  templating    .gitignore.hbs ✔
  copying       .prettierignore ✔
  copying       README.md ✔
  copying       app-config.local.yaml ✔
  copying       app-config.production.yaml ✔
  templating    app-config.yaml.hbs ✔
  templating    backstage.json.hbs ✔
  templating    catalog-info.yaml.hbs ✔
  copying       lerna.json ✔
  templating    package.json.hbs ✔
  copying       tsconfig.json ✔
  copying       README.md ✔
  copying       entities.yaml ✔
  copying       org.yaml ✔
  copying       template.yaml ✔
  copying       catalog-info.yaml ✔
  copying       index.js ✔
  copying       package.json ✔
  copying       README.md ✔
  templating    .eslintrc.js.hbs ✔
  copying       Dockerfile ✔
  copying       README.md ✔
  templating    package.json.hbs ✔
  copying       index.test.ts ✔
  copying       index.ts ✔
  copying       types.ts ✔
  copying       app.ts ✔
  copying       auth.ts ✔
  copying       catalog.ts ✔
  copying       proxy.ts ✔
  templating    search.ts.hbs ✔
  copying       scaffolder.ts ✔
  copying       techdocs.ts ✔
  templating    .eslintrc.js.hbs ✔
  copying       cypress.json ✔
  templating    package.json.hbs ✔
  copying       android-chrome-192x192.png ✔
  copying       favicon-16x16.png ✔
  copying       apple-touch-icon.png ✔
  copying       favicon-32x32.png ✔
  copying       favicon.ico ✔
  copying       index.html ✔
  copying       manifest.json ✔
  copying       robots.txt ✔
  copying       safari-pinned-tab.svg ✔
  copying       .eslintrc.json ✔
  copying       app.js ✔
  copying       App.test.tsx ✔
  copying       App.tsx ✔
  copying       apis.ts ✔
  copying       index.tsx ✔
  copying       setupTests.ts ✔
  copying       EntityPage.tsx ✔
  copying       LogoFull.tsx ✔
  copying       LogoIcon.tsx ✔
  copying       Root.tsx ✔
  copying       index.ts ✔
  copying       SearchPage.tsx ✔

 Moving to final location:
  moving        backstage-app ✔

 Building the app:
  executing     yarn install ✔
  executing     yarn tsc ✔

🥇  Successfully created backstage-app


 All set! Now you might want to:
  Run the app: cd backstage-app && yarn dev
  Set up the software catalog: https://backstage.io/docs/features/software-catalog/configuration
  Add authentication: https://backstage.io/docs/auth/
Backstage 앱 구성
생성된 baskstage-app 디렉토리로 이동하면 app-config.yaml 파일이 있다. 이 파일안에는 app, database, github tokens, catalogs 등의 설정을 할 수 있다.
app:
  title: Scaffolded Backstage App
  baseUrl: http://127.0.0.1:3000

organization:
  name: Company
postgres 설정
# sudo -u postgres
# psql
psql (12.9 (Ubuntu 12.9-0ubuntu0.20.04.1))
Type "help" for help.

postgres=# ALTER USER postgres PASSWORD 'secret';
postgres=# GRANT SELECT ON pg_database TO postgres
yarn add --cwd packages/backend pgapp-config.yaml을 수정한다.
  database:
    # config options: https://node-postgres.com/api/client
    client: pg
    connection:
      host: 127.0.0.1
      port: 5432
      user: postgres
      password: secret
앱 실행
cd backstage-app

# install dependencies
yarn install --frozen-lockfile

# generate type definitions
yarn tsc

# build packages
yarn build
cd my-backstage-app
yarn dev
실행 시 다음과 같은 오류가 발생하는 경우
[1] 2022-10-01T14:43:40.275Z backstage info Created UrlReader predicateMux{readers=azure{host=dev.az ure.com,authed=false},bitbucketCloud{host=bitbucket.org,authed=false},github{host=github.com,authed= false},gitlab{host=gitlab.com,authed=false},awsS3{host=amazonaws.com,authed=false},fetch{} [1] Backend failed to start up Error: Failed to connect to the database to make sure that 'backstage _plugin_catalog' exists, error: Ident authentication failed for user "postgres" [1] at DatabaseManager.getDatabase (/root/backstage-app/node_modules/@backstage/backend-common/d ist/index.cjs.js:1010:15) [1] at processTicksAndRejections (node:internal/process/task_queues:96:5) [1] at async CatalogBuilder.build (/root/backstage-app/node_modules/@backstage/plugin-catalog-ba ckend/dist/index.cjs.js:4033:22) [1] at async createPlugin (webpack-internal:///./src/plugins/catalog.ts:14:44) [1] at async main (webpack-internal:///./src/index.ts:96:31) ^Cpostgres 의 다음파일을 수정한다.
# vi /var/lib/pgsql/12/data/pg_hba.conf host all all 127.0.0.1/32 indent -> host all all 127.0.0.1/32 trust 로 변경
변경 후 systemctl restart postgresql-12 재시작한다.
이제 3000번 포트로 접근해보자.

Kubernetes 플러그인 설치
cd packages/app
yarn add @backstage/plugin-kubernetes
// packages/app/src/components/catalog/EntityPage.tsx
import { EntityKubernetesContent } from '@backstage/plugin-kubernetes';
const serviceEntityPage = (
<EntityLayoutWrapper>
// ...
<EntityLayout.Route path="/kubernetes" title="Kubernetes">
<EntityKubernetesContent />
</EntityLayout.Route>
<EntityLayoutWrapper>
);
cd packages/backend
yarn add @backstage/plugin-kubernetes-backend
// packages/backend/src/plugins/kubernetes.ts
import { KubernetesBuilder } from '@backstage/plugin-kubernetes-backend';
import { Router } from 'express';
import { PluginEnvironment } from '../types';
import { CatalogClient } from '@backstage/catalog-client';
export default async function createPlugin(
env: PluginEnvironment,
): Promise<Router> {
const catalogApi = new CatalogClient({ discoveryApi: env.discovery });
const { router } = await KubernetesBuilder.createBuilder({
logger: env.logger,
config: env.config,
catalogApi,
}).build();
return router;
}// packages/backend/src/index.ts
import kubernetes from './plugins/kubernetes';
async function main() {
...
const kubernetesEnv = useHotMemoize(module, () => createEnv('kubernetes'));
apiRouter.use('/kubernetes', await kubernetes(kubernetesEnv));
...
}
apiVersion: v1
kind: ServiceAccount
metadata:
  name: dev-user
  namespace: backstage
k8s 1.24 이상이 경우에는 sa에 대한 secret을 만들어야 한다.
apiVersion: v1
kind: Secret
type: kubernetes.io/service-account-token
metadata:
  name: dev-user
  namespace: backstage
  annotations:
    kubernetes.io/service-account.name: "dev-user"
apiVersion: rbac.authorization.k8s.io/v1
kind: ClusterRoleBinding
metadata:
  name: backstage-cluster-admin
roleRef:
  apiGroup: rbac.authorization.k8s.io
  kind: ClusterRole
  name: cluster-admin
subjects:
- kind: ServiceAccount
  name: dev-user
  namespace: backstage
component.yaml 에 annotation을 추가한다.
apiVersion: backstage.io/v1alpha1
kind: Component
metadata:
  annotations:
    backstage.io/kubernetes-id: backstage
    backstage.io/kubernetes-namespace: backstage
...
모니터링 앱 배포
apiVersion: apps/v1
kind: Deployment
metadata:
  name: my-kubernetes-component
  namespace: backstage
  labels:
    backstage.io/kubernetes-id: petstore
spec:
  replicas: 3
  selector:
    matchLabels:
      app: my-kubernetes-component
  template:
    metadata:
      labels:
        app: my-kubernetes-component
        backstage.io/kubernetes-id: petstore
    spec:
      containers:
      - name: ubuntu
        image: ubuntu
        command:
        - /bin/sh
        args:
        - -c
        - "tail -f /dev/null"

플러그인 만들기
# yarn new --select plugin
yarn run v1.22.19
$ backstage-cli new --scope internal --select plugin
? Enter the ID of the plugin [required] myplugin

Creating frontend plugin @internal/plugin-myplugin

 Checking Prerequisites:
  availability  plugins/myplugin ✔
  creating      temp dir ✔
...
🎉  Successfully created plugin

Done in 37.25s.
http://localhost:3000/myplugin 으로 호출하면 다음과 같은 페이지를 볼 수 있다.

생성된 소스는 plugins 폴더에 존재한다.
'Kubernetes > devops' 카테고리의 다른 글
| tekton과 argocd를 이용한 GitOps 구축하기 (0) | 2023.01.12 |
|---|---|
| Giblab install on kubernetes (0) | 2022.10.09 |
| dapr (0) | 2022.09.30 |
| DevSpace (0) | 2022.09.29 |
| Tekton Trigger (0) | 2022.09.14 |


