| 일 | 월 | 화 | 수 | 목 | 금 | 토 |
|---|---|---|---|---|---|---|
| 1 | 2 | 3 | 4 | 5 | 6 | 7 |
| 8 | 9 | 10 | 11 | 12 | 13 | 14 |
| 15 | 16 | 17 | 18 | 19 | 20 | 21 |
| 22 | 23 | 24 | 25 | 26 | 27 | 28 |
- knative
- gitops
- CANARY
- blue/green
- seldon core
- 카오스 엔지니어링
- argocd
- Pulumi
- CI/CD
- tekton
- opensearch
- keda
- Kubernetes
- Model Serving
- Argo
- eBPF
- xdp
- 오퍼레이터
- nginx ingress
- MLflow
- Litmus
- opentelemetry
- Continuous Deployment
- Kubeflow
- operator
- Kopf
- kubernetes operator
- serving
- Kubernetes 인증
- mlops
- Today
- Total
Kubernetes 이야기
GitOps and Flux 본문
GitOps는 클라우드 네이티브 애플리케이션을 위해 git을 사용해 인프라 및 애플리케이션을 관리하기 위한 지속적인 배포 방법이다.
GitOps는 Git 풀 요청을 사용해 인프라 프로비저닝 및 배포를 자동으로 관리한다.
즉, Kubernetes에서 Deployment나 StatefulSet, Service, Ingress 등의 workload등을 배포하기 위해서 manifest 파일을 Git에 저장하여 운영중인 Kubernetes의 상태가 리포지토리에 지정된 상태와 일치하도록 하는 자동화된 프로세스를 갖는 방법이다.
완전히 동일하지는 않지만, 일종의 Kubernetes Operator의 개념과 동일한다.
GitOps는 DevOps와 어떤 점이 다를까?
GitOps와 DevOps는 동일한 원칙 및 목표를 일부 공유한다. DevOps의 핵심은 문화적 변화이며, 개발 팀과 운영 팀이 서로 협업할 수 있는 방법을 제공한다.
GitOps는 협업, CI/CD, 버전 관리와 같은 DevOps 사례를 수용하여 인프라 자동화 및 애플리케이션 배포에 적용할 수 있는 툴과 프레임워크를 제공한다.
GitOps는 2가지 방법을 제공한다.
- 푸시 기반 배포 전략 : 애플리케이션 코드가 업데이트될 때마다 빌드 파이프라인이 트리거되어 컨테이너 이미지를 빌드하고 마지막으로 환경 구성 리포지토리가 새 배포 설명자로 업데이트된다.

- 풀 기반 배포 전략 : 풀 기반 배포 전략은 푸시 기반 변형과 동일한 개념을 사용하지만 배포 파이프라인이 작동하는 방식이 다르다. 기존 CI/CD 파이프라인은 예를 들어 새 코드가 애플리케이션 리포지토리로 푸시될 때 외부 이벤트에 의해 트리거된다. 풀 기반 배포 접근 방식을 사용하면 Operator 가 도입된다.

Kubernets에서 대표적으로 사용되는 GitOps 도구로는 아래와 같은 것들이 존재한다.
이 중 GitOps의 개념을 최초로 언급한 WeaveWork사의 Flux를 테스트해보자.
Flux
사용자가 개발한 애플리케이션을 서버까지 배포하는 과정을 일반적으로 CI와 CD로 구분한다. CI는 전통적으로 Jenkins라는 도구나 Cloud Native 한 환경에서는 Argo, Tekton 등을 이용하여 CI 과정의 Build Pipleline을 작성한다.
CI 참고자료
https://kmaster.tistory.com/25?category=925859
Argo workflow 를 활용하여 CI/CD 구축하기 (기본설치)
Argo Workflow Argo Workflows는 Kubernetes에서 병렬 작업을 오케스트레이션하기 위한 오픈 소스 컨테이너 네이티브 워크플로 엔진입니다. Argo Workflows는 Kubernetes CRD(Custom Resource Definition)로 구..
kmaster.tistory.com
https://kmaster.tistory.com/23?category=925859
Argo Workflow를 사용한 CI/CD 구성 (Kaniko / Trivy)
Argo Workflow에서 Container Image 빌드와 만들어진 Image의 보안취약성 검사툴인 Trivy를 사용하여 Pipeline을 만들어 보자. https://kmaster.tistory.com/18?category=925859 Docker 없이 Docker Image 만들기..
kmaster.tistory.com
자, 이제 GitOps 풀 방식을 다시 보자.

BuildPipeline에서 애플리케이션의 Container이미지를 Image Registry Push하고 배포를 위한 Manifest 파일을 Git 저장소에 저장할 수 있다.
전제조건
- Kubernetes Cluster
- GitHub 개인 액세스 토큰
설치
Flux CLI 설치
# curl -s https://fluxcd.io/install.sh | sudo bash
[INFO]  Downloading metadata https://api.github.com/repos/fluxcd/flux2/releases/latest
[INFO]  Using 0.30.2 as release
[INFO]  Downloading hash https://github.com/fluxcd/flux2/releases/download/v0.30.2/flux_0.30.2_checksums.txt
[INFO]  Downloading binary https://github.com/fluxcd/flux2/releases/download/v0.30.2/flux_0.30.2_linux_amd64.tar.gz
[INFO]  Verifying binary download
which: no shasum in (/sbin:/bin:/usr/sbin:/usr/bin)
[INFO]  Installing flux to /usr/local/bin/flux
GitHub Token 생성
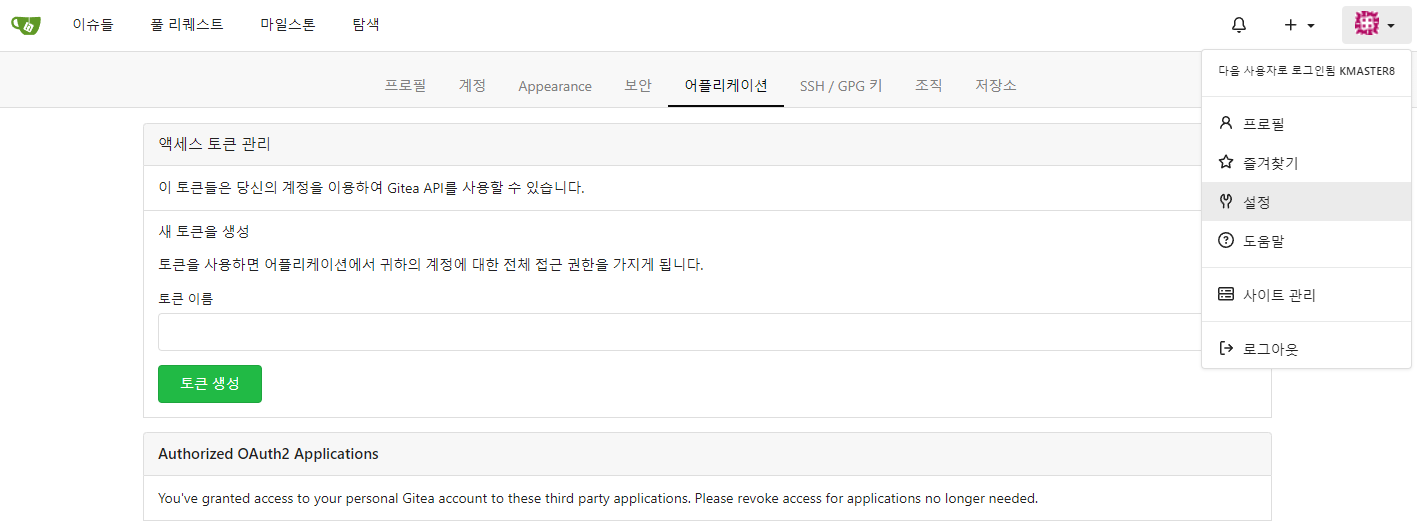
Git 연동을 위해 Token을 생성해야 한다. 이번에는 GitHub가 아닌 Gitea를 사용해서 테스트해 보자.

자격증명 내보내기
Gitea 개인 액세스 토큰과 사용자 이름을 내보낸다.
# export GITHUB_TOKEN=<your-token>
# export GITHUB_USER=<your-username>
클러스터에 Flux 설치
bootstrap은 Kubernetes 클러스터에 Flux를 설치하고 Git 리포지토리에서 자체적으로 관리하도록 구성한다.
# flux bootstrap git \
>   --url=https://gitea.10.20.200.121.sslip.io/kmaster8/kmaster8.git \
>   --username=$GITHUB_USER \
>   --password=$GITHUB_TOKEN \
>   --token-auth=true \
>   --path=clusters/my-cluster \
>   --ca-file=/tmp/ca.crt
► cloning branch "main" from Git repository "https://gitea.10.20.200.121.sslip.io/kmaster8/kmaster8.git"
✔ cloned repository
► generating component manifests
✔ generated component manifests
✔ committed sync manifests to "main" ("4f95293ac703e1686e8c2b4b869f1ca86a3968cc")
► pushing component manifests to "https://gitea.10.20.200.121.sslip.io/kmaster8/kmaster8.git"
✔ installed components
✔ reconciled components
► determining if source secret "flux-system/flux-system" exists
► generating source secret
► applying source secret "flux-system/flux-system"
✔ reconciled source secret
► generating sync manifests
✔ generated sync manifests
✔ committed sync manifests to "main" ("fda7c4ef87e0d54581b1244324f78101a71b9a47")
► pushing sync manifests to "https://gitea.10.20.200.121.sslip.io/kmaster8/kmaster8.git"
► applying sync manifests
✔ reconciled sync configuration
◎ waiting for Kustomization "flux-system/flux-system" to be reconciled
✔ Kustomization reconciled successfully
► confirming components are healthy
✔ helm-controller: deployment ready
✔ kustomize-controller: deployment ready
✔ notification-controller: deployment ready
✔ source-controller: deployment ready
✔ all components are healthy
위의 부트스트랩 명령은 다음을 수행한다.
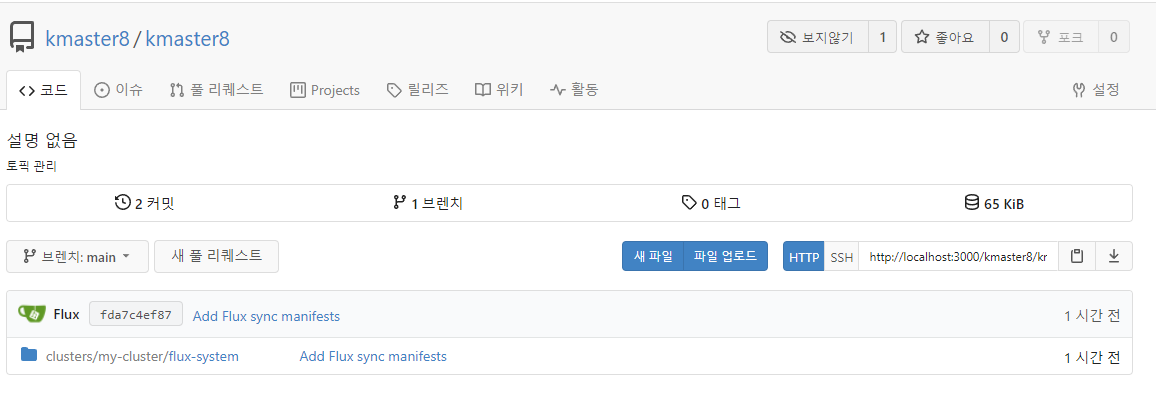
- GitHub 계정에 git 리포지토리 생성
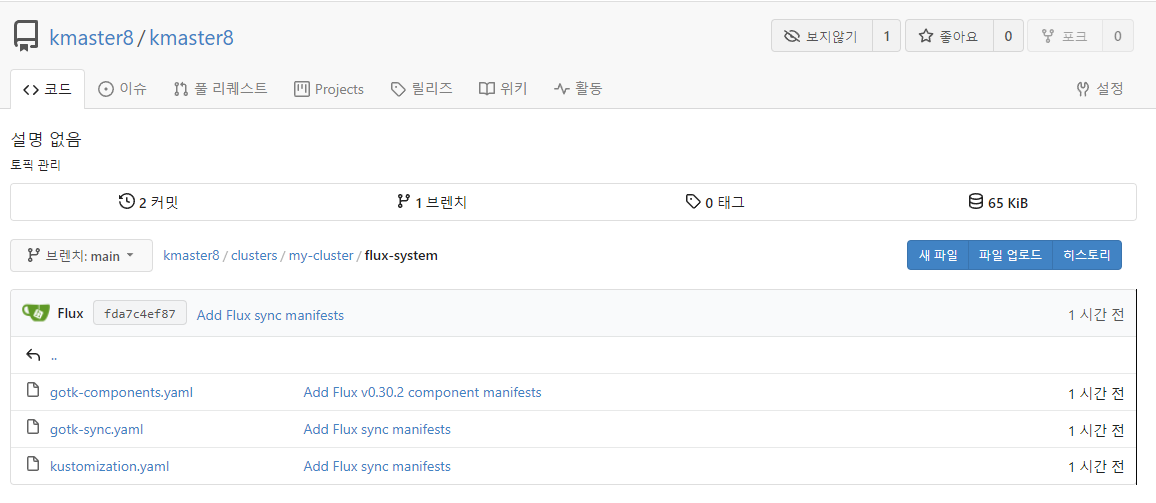
- 저장소에 Flux 구성 요소 매니페스트를 추가
- Kubernetes 클러스터에 Flux 구성 요소 배포
- /clusters/my-cluster/저장소 의 경로를 추적하도록 Flux 구성 요소를 구성
실제 배포된 Repo를 확인해 보자.


Git 저장소 복제
생성된 저장소를 로컬 머신에 복제해 보자.
먼저 현재 gitea가 사설 인증서로 설치되어 있어 git clone시 인증서 오류가 발생하여 아래와 같이 SSL Verify를 off 한다.
# git config --global http.sslVerify false# git clone https://gitea.10.20.200.121.sslip.io/kmaster8/kmaster8.git
# cd kmaster8
Flux에 podinfo 저장소 추가
이 예제는 공개 저장소 인 github.com/stefanprodan/podinfo를 사용한다.
flux create source git podinfo \
  --url=https://github.com/stefanprodan/podinfo \
  --branch=master \
  --interval=30s \
  --export > ./clusters/my-cluster/podinfo-source.yaml
# git add -A && git commit -m "Add podinfo GitRepository"
[main d95f021] Add podinfo GitRepository
1 file changed, 12 insertions(+)
create mode 100644 clusters/my-cluster/podinfo-source.yaml
# git push
Username for 'https://gitea.10.20.200.121.sslip.io':
Password for 'https://77b0a5f2a5844587c6c6f1b315fd2f5bb4211bc9@gitea.10.20.200.121.sslip.io':
Counting objects: 8, done.
Delta compression using up to 16 threads.
Compressing objects: 100% (3/3), done.
Writing objects: 100% (5/5), 550 bytes | 0 bytes/s, done.
Total 5 (delta 0), reused 0 (delta 0)
remote: . Processing 1 references
remote: Processed 1 references in total
To https://gitea.10.20.200.121.sslip.io/kmaster8/kmaster8.git
fda7c4e..d95f021 main -> main
이제 Flux에서 사용한 repo 정보를 조회해 보자.
# kubectl get gitrepositories.source.toolkit.fluxcd.io -A
NAMESPACE     NAME          URL                                                          AGE   READY   STATUS
flux-system   flux-system   https://gitea.10.20.200.121.sslip.io/kmaster8/kmaster8.git   90m   True    stored artifact for revision 'main/d95f0214a58602bb3924e84e56a61ce5adf40a92'
flux-system   podinfo       https://github.com/stefanprodan/podinfo                      47s   True    stored artifact for revision 'master/bf09377bfd5d3bcac1e895fa8ce52dc76695c060'
podinfo 애플리케이션 배포
podinfo 저장소에 있는 kustomize 디렉터리 를 빌드하고 적용하도록 Flux를 구성하자.
flux create kustomization podinfo \
  --target-namespace=default \
  --source=podinfo \
  --path="./kustomize" \
  --prune=true \
  --interval=5m \
  --export > ./clusters/my-cluster/podinfo-kustomization.yaml
# git add -A && git commit -m "Add podinfo Kustomization"
# git push
파일 구조는 아래와 같다.
# tree
.
└── clusters
    └── my-cluster
        ├── flux-system
        │   ├── gotk-components.yaml
        │   ├── gotk-sync.yaml
        │   └── kustomization.yaml
        ├── podinfo-kustomization.yaml
        └── podinfo-source.yaml
배포된 앱을 확인해보자.
# kubectl -n default get deployments.apps podinfo
NAME      READY   UP-TO-DATE   AVAILABLE   AGE
podinfo   2/2     2            2           2m26s

# kubectl -n default get svc podinfo
NAME      TYPE        CLUSTER-IP    EXTERNAL-IP   PORT(S)             AGE
podinfo   ClusterIP   10.98.203.8   <none>        9898/TCP,9999/TCP   2m48s
Flux 동기화 조회
flux get 명령을 사용하기 애플리케이션의 상태를 조회할 수 있다.
# flux get kustomizations --watch
NAME            REVISION        SUSPENDED       READY   MESSAGE
flux-system     main/91c333b    False           True    Applied revision: main/91c333b
podinfo master/bf09377  False   True    Applied revision: master/bf09377
애플리케이션 배포 변경
제어하지 않는 리포지토리에서 배포를 사용자 지정하려면 Flux 인라인 패치 를 사용할 수 있다.
podinfo-kustomization.yaml의 spec에 다음을 추가한다.
patches:
- patch: |-
    apiVersion: autoscaling/v2beta2
    kind: HorizontalPodAutoscaler
    metadata:
      name: podinfo
    spec:
      minReplicas: 3
  target:
    name: podinfo
    kind: HorizontalPodAutoscaler
그 다음, podinfo-kustomization.yaml변경 사항 을 커밋하고 푸시한다.
git add -A && git commit -m "Increase podinfo minimum replicas"
git push
이렇게 수정하면 아래와 같이 replicas가 동적으로 반영되는 것을 확인할 수 있다.
# kubectl get deployments.apps -n default podinfo
NAME      READY   UP-TO-DATE   AVAILABLE   AGE
podinfo   3/3     3            3           18m
참고
'Kubernetes > devops' 카테고리의 다른 글
| argocd와 keycloak을 사용하여 SSO 구축하기 (0) | 2022.05.14 |
|---|---|
| argocd (설치) (0) | 2022.05.13 |
| Argo Event (0) | 2022.05.03 |
| Keda와 Prometheus를 이용한 Scale in/out (0) | 2022.04.28 |
| Kubernetes의 Replica를 0으로 확장 (KEDA) (0) | 2022.04.27 |


