| 일 | 월 | 화 | 수 | 목 | 금 | 토 |
|---|---|---|---|---|---|---|
| 1 | 2 | 3 | 4 | 5 | 6 | 7 |
| 8 | 9 | 10 | 11 | 12 | 13 | 14 |
| 15 | 16 | 17 | 18 | 19 | 20 | 21 |
| 22 | 23 | 24 | 25 | 26 | 27 | 28 |
- keda
- opensearch
- 카오스 엔지니어링
- knative
- mlops
- eBPF
- Kubeflow
- gitops
- Kubernetes 인증
- nginx ingress
- opentelemetry
- 오퍼레이터
- CANARY
- Litmus
- kubernetes operator
- CI/CD
- seldon core
- Pulumi
- Kopf
- Kubernetes
- argocd
- tekton
- Model Serving
- blue/green
- MLflow
- xdp
- Argo
- operator
- serving
- Continuous Deployment
- Today
- Total
Kubernetes 이야기
argocd (활용 - Git 연동) 본문

Argo CD는 GitHub 리포지토리가 변경될 때마다 애플리케이션을 자동으로 동기화하고 배포하는 지속적인 전달 도구를 제공한다. 애플리케이션의 배포 및 수명 주기를 관리하여 Kubernetes 환경에서 버전 제어, 구성 및 애플리케이션 정의를 위한 솔루션을 제공하고 이해하기 쉬운 사용자 인터페이스로 복잡한 데이터를 구성한다. Jsonnet, Kustomize, Helm 을 포함한 여러 유형의 Kubernetes 매니페스트를 처리할 수 있다. GitHub, GitLab 및 Bitbucket의 Webhook 알림도 지원한다.
이번에는 Kubernetes에서 배포할 기본적인 Yaml을 Git에서 관리하고, Argo CD를 사용하여 Kubernetes와 동기화하는 예제를 살펴보자.
예제
Step 1 : Git Repository 로부터 Application 생성하기
응용 프로그램을 만드는 방법에는 두 가지가 있다. CLI를 통하거나 UI를 통할 수 있다. CLI로 만드는 방법은 아래와 같다.
# argocd app create guestbook --repo https://github.com/kmaster8/argocd-example-apps.git --path guestbook --dest-server https://kubernetes.default.svc --dest-namespace test
application 'guestbook' created
UI에서는 아래와 같이 생성하면 된다.

생성이 완료되면 아래와 같이 보인다.

Step 2 : Application 동기화
응용 프로그램이 생성되면 argocd app get guestbook아래와 같이 명령을 사용하여 상태를 볼 수 있다.
# argocd app get guestbook

Name:               guestbook
Project:            default
Server:             https://kubernetes.default.svc
Namespace:          test
URL:                https://argocd.192.168.50.16.nip.io/applications/guestbook
Repo:               https://github.com/kmaster8/argocd-example-apps.git
Target:
Path:               guestbook
SyncWindow:         Sync Allowed
Sync Policy:        <none>
Sync Status:        OutOfSync from  (53e28ff)
Health Status:      Missing

GROUP  KIND        NAMESPACE  NAME          STATUS     HEALTH   HOOK  MESSAGE
       Service     test       guestbook-ui  OutOfSync  Missing
apps   Deployment  test       guestbook-ui  OutOfSync  Missing
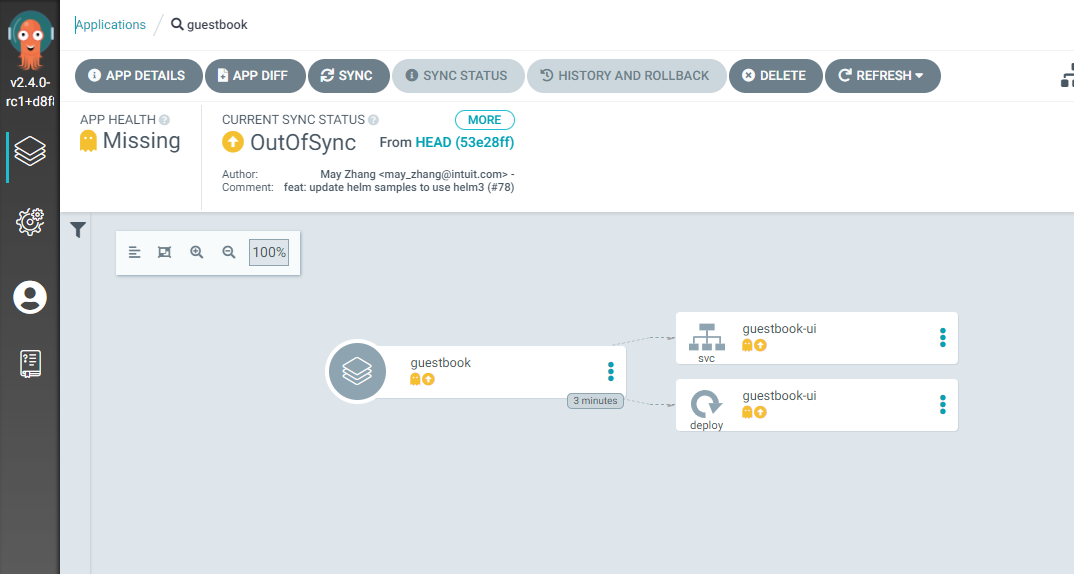
UI에서는 아래와 같이 보인다.

처음에는 애플리케이션이 아직 배포되지 않았기 때문에 상태가 표시 OutofSync로 표시된다. 동기화를 위해 아래와 같이 실행한다. 혹은 UI에서 [Sync] 버튼을 클릭한다.
# argocd app sync guestbook
TIMESTAMP                  GROUP        KIND   NAMESPACE                  NAME    STATUS    HEALTH        HOOK  MESSAGE
2022-05-17T20:16:14+09:00            Service        test          guestbook-ui  OutOfSync  Missing
2022-05-17T20:16:14+09:00   apps  Deployment        test          guestbook-ui  OutOfSync  Missing
2022-05-17T20:16:14+09:00            Service        test          guestbook-ui    Synced  Healthy
2022-05-17T20:16:14+09:00            Service        test          guestbook-ui    Synced   Healthy              service/guestbook-ui created
2022-05-17T20:16:14+09:00   apps  Deployment        test          guestbook-ui  OutOfSync  Missing              deployment.apps/guestbook-ui created
2022-05-17T20:16:14+09:00   apps  Deployment        test          guestbook-ui    Synced  Progressing              deployment.apps/guestbook-ui created

Name:               guestbook
Project:            default
Server:             https://kubernetes.default.svc
Namespace:          test
URL:                https://argocd.192.168.50.16.nip.io/applications/guestbook
Repo:               https://github.com/kmaster8/argocd-example-apps.git
Target:
Path:               guestbook
SyncWindow:         Sync Allowed
Sync Policy:        <none>
Sync Status:        Synced to  (53e28ff)
Health Status:      Progressing

Operation:          Sync
Sync Revision:      53e28ff20cc530b9ada2173fbbd64d48338583ba
Phase:              Succeeded
Start:              2022-05-17 20:16:14 +0900 KST
Finished:           2022-05-17 20:16:14 +0900 KST
Duration:           0s
Message:            successfully synced (all tasks run)

GROUP  KIND        NAMESPACE  NAME          STATUS  HEALTH       HOOK  MESSAGE
       Service     test       guestbook-ui  Synced  Healthy            service/guestbook-ui created
apps   Deployment  test       guestbook-ui  Synced  Progressing        deployment.apps/guestbook-ui created
다시 상태를 확인해보자.
# argocd app get guestbook
Name:               guestbook
Project:            default
Server:             https://kubernetes.default.svc
Namespace:          test
URL:                https://argocd.192.168.50.16.nip.io/applications/guestbook
Repo:               https://github.com/kmaster8/argocd-example-apps.git
Target:
Path:               guestbook
SyncWindow:         Sync Allowed
Sync Policy:        <none>
Sync Status:        Synced to  (53e28ff)
Health Status:      Healthy

GROUP  KIND        NAMESPACE  NAME          STATUS  HEALTH   HOOK  MESSAGE
       Service     test       guestbook-ui  Synced  Healthy        service/guestbook-ui created
apps   Deployment  test       guestbook-ui  Synced  Healthy        deployment.apps/guestbook-ui created
UI에서도 정상상태로 보인다.

실제 서버에서 kubectl 로 확인해 보자.
# kubectl get all -n test
NAME                               READY   STATUS    RESTARTS   AGE
pod/guestbook-ui-76f97c94c-nwz7k   1/1     Running   0          2m5s

NAME                   TYPE        CLUSTER-IP      EXTERNAL-IP   PORT(S)   AGE
service/guestbook-ui   ClusterIP   10.96.206.223   <none>        80/TCP    2m5s

NAME                           READY   UP-TO-DATE   AVAILABLE   AGE
deployment.apps/guestbook-ui   1/1     1            1           2m5s

NAME                                     DESIRED   CURRENT   READY   AGE
replicaset.apps/guestbook-ui-76f97c94c   1         1         1       2m5s
자, 이제 replicas를 2로 변경해보자.
replicas를 변경한 후 저장하면 아래와 같이 파일한개가 변경되었다.

argocd에서 체크 주기가 지나면 ( 5분 ) 아래와 같이 파일한개 변경된것을 감지한다. 하지만, 자동으로 Sync를 하지는 않는다.

Auto Sync를 위해서는 아래와 같이 ENABLE AUTO-SYNC를 클릭한다.

CLI로는 다음을 수행한다.
argocd app set <APPNAME> --sync-policy automated
클릭을 하면 바로 Sync가 수행된다. 수행완료된 상태를 보자.
# kubectl get all -n test
NAME                               READY   STATUS    RESTARTS   AGE
pod/guestbook-ui-76f97c94c-ncr8x   1/1     Running   0          29s
pod/guestbook-ui-76f97c94c-nwz7k   1/1     Running   0          18m

NAME                   TYPE        CLUSTER-IP      EXTERNAL-IP   PORT(S)   AGE
service/guestbook-ui   ClusterIP   10.96.206.223   <none>        80/TCP    18m

NAME                           READY   UP-TO-DATE   AVAILABLE   AGE
deployment.apps/guestbook-ui   2/2     2            2           18m

NAME                                     DESIRED   CURRENT   READY   AGE
replicaset.apps/guestbook-ui-76f97c94c   2         2         2       18m
만약 롤백을 하려면 상단에 롤백 버튼 클릭한 다음 롤백할 Revision을 선택한다.

위와 같이 이전 revision으로 롤백하면 상태는 아래와 같이 다시 replicas=1로 세팅된다.
$ kubectl get all -n test
NAME                               READY   STATUS    RESTARTS   AGE
pod/guestbook-ui-76f97c94c-nwz7k   1/1     Running   0          20m

NAME                   TYPE        CLUSTER-IP      EXTERNAL-IP   PORT(S)   AGE
service/guestbook-ui   ClusterIP   10.96.206.223   <none>        80/TCP    20m

NAME                           READY   UP-TO-DATE   AVAILABLE   AGE
deployment.apps/guestbook-ui   1/1     1            1           20m

NAME                                     DESIRED   CURRENT   READY   AGE
replicaset.apps/guestbook-ui-76f97c94c   1         1         1       20m
하지만, 상태를 보면 OutOfSync상태이다. 이전 revision으로 롤백했기 때문에 최종 HEAD revistion과는 소스가 다르기 때문이다.

argocd문서에는 자동 동기화가 활성화된 애플리케이션에 대해서는 롤백을 수행할 수 없다고 되어 있으나, 필자가 테스트한 버전에서는 롤백이 가능했다, 하지만 롤백 시 "Auto-Sync needs to be disabled in order for rollback to occur. Are you sure you want to disable auto-sync and rollback application 'guestbook" 메시지가 나타난다. 즉, Rollback을 수행하면 auto-sync 기능이 다시 disable된다.
'Kubernetes > devops' 카테고리의 다른 글
| argo CD Image Updater (1) | 2022.05.20 |
|---|---|
| argocd (활용 - helm chart 및 Kustomize 배포) (0) | 2022.05.18 |
| argocd와 keycloak을 사용하여 SSO 구축하기 (0) | 2022.05.14 |
| argocd (설치) (0) | 2022.05.13 |
| GitOps and Flux (0) | 2022.05.07 |


