| 일 | 월 | 화 | 수 | 목 | 금 | 토 |
|---|---|---|---|---|---|---|
| 1 | 2 | 3 | 4 | 5 | 6 | 7 |
| 8 | 9 | 10 | 11 | 12 | 13 | 14 |
| 15 | 16 | 17 | 18 | 19 | 20 | 21 |
| 22 | 23 | 24 | 25 | 26 | 27 | 28 |
- nginx ingress
- mlops
- kubernetes operator
- Litmus
- Model Serving
- operator
- seldon core
- opentelemetry
- MLflow
- keda
- Argo
- Kopf
- Pulumi
- Kubeflow
- Continuous Deployment
- opensearch
- Kubernetes 인증
- gitops
- CI/CD
- eBPF
- Kubernetes
- 카오스 엔지니어링
- tekton
- xdp
- blue/green
- 오퍼레이터
- serving
- knative
- CANARY
- argocd
- Today
- Total
Kubernetes 이야기
jenkins 를 활용하여 Kubernetes에 이미지 배포 및 모니터링 본문

Jenkins는 소프트웨어 개발 시 지속적 통합(CI) 서비스를 제공하는 툴로써 대시보드,Pipeline, 다양한 플러그인 등을 지원한다.
Jenkins는 Kubernetes환경이 나오기 전부터 사용되던 툴로 PC 또는 VM 환경에 설치하여 운영을 많이 해 왔고, 다양한 플러그인을 제공, Groovy Script를 기반으로 다양한 프로세스를 만들 수 있다는게 장점이다.
이번 글에서는 Jenkins를 Kubernetes의 Pod로 실행하고, Container image build 후 Kubernetes에 Deploy하는 절차를 알아보자.
Jenkins는 Master 단독으로도 CI/CD 환경을 구축할 수 있지만, 빌드하는 프로젝트가 많은 경우 Master / Slave 구조로 운영한다.
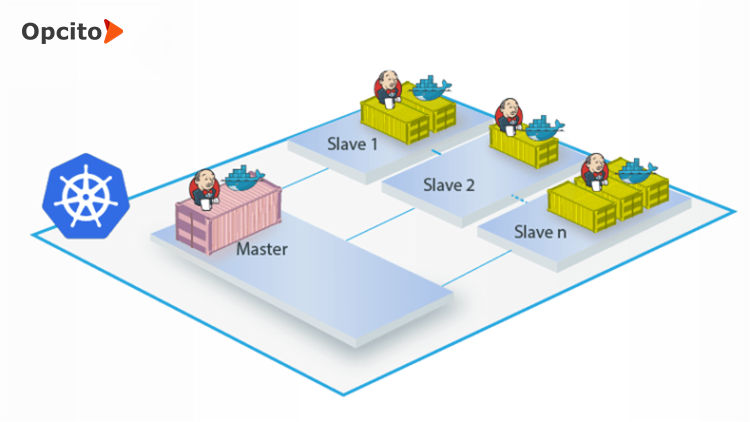
Jenkins설치는 크게 3가지 방법이 있다.
- Helm (v3) 설치 방법
- Yaml 설치 방법
- Jenkins Operator를 이용한 설치 방법
이번에는 Helm 으로 설치를 진행해 보자.
설치
$ kubectl create namespace jenkins# helm repo add jenkinsci https://charts.jenkins.io
# helm repo updatehelm 설치 전 먼저 jenkins volume을 먼저 생성하자.
apiVersion: v1
kind: PersistentVolume
metadata:
  name: jenkins-pv
spec:
  capacity:
    storage: 8Gi
  volumeMode: Filesystem
  accessModes:
  - ReadWriteOnce
  persistentVolumeReclaimPolicy: Delete
  local:
    path: /data/jenkins
  nodeAffinity:
    required:
      nodeSelectorTerms:
      - matchExpressions:
        - key: kubernetes.io/hostname
          operator: In
          values:
          - node1
apiVersion: v1
kind: PersistentVolumeClaim
metadata:
name: jenkins-pvc
namespace: jenkins
spec:
accessModes:
- ReadWriteOnce
resources:
requests:
storage: 8Gi
volumeMode: Filesystem이제 jenkins라는 service account를 생성한다.
---
apiVersion: v1
kind: ServiceAccount
metadata:
  name: jenkins
  namespace: jenkins
---
apiVersion: rbac.authorization.k8s.io/v1
kind: ClusterRole
metadata:
  annotations:
    rbac.authorization.kubernetes.io/autoupdate: "true"
  labels:
    kubernetes.io/bootstrapping: rbac-defaults
  name: jenkins
rules:
- apiGroups:
  - '*'
  resources:
  - statefulsets
  - services
  - replicationcontrollers
  - replicasets
  - podtemplates
  - podsecuritypolicies
  - pods
  - pods/log
  - pods/exec
  - podpreset
  - poddisruptionbudget
  - persistentvolumes
  - persistentvolumeclaims
  - jobs
  - endpoints
  - deployments
  - deployments/scale
  - daemonsets
  - cronjobs
  - configmaps
  - namespaces
  - events
  - secrets
  verbs:
  - create
  - get
  - watch
  - delete
  - list
  - patch
  - update
- apiGroups:
  - ""
  resources:
  - nodes
  verbs:
  - get
  - list
  - watch
  - update
---
apiVersion: rbac.authorization.k8s.io/v1
kind: ClusterRoleBinding
metadata:
  annotations:
    rbac.authorization.kubernetes.io/autoupdate: "true"
  labels:
    kubernetes.io/bootstrapping: rbac-defaults
  name: jenkins
roleRef:
  apiGroup: rbac.authorization.k8s.io
  kind: ClusterRole
  name: jenkins
subjects:
- apiGroup: rbac.authorization.k8s.io
  kind: Group
  name: system:serviceaccounts:jenkins
helm 설치 시 필요한 values.yaml 을 https://raw.githubusercontent.com/jenkinsci/helm-charts/main/charts/jenkins/values.yaml 에서 다운 받아 아래의 내용을 수정한다.
- serviceType: NodePort
- existingClaim: jenkins-pvc
- storageClass:
- serviceAccount:
    create: false
    name: jenkins
이제 jenkins를 실행해 보자.
# helm install jenkins -n jenkins -f jenkins-values.yaml jenkinsci/jenkins
NAME: jenkins
LAST DEPLOYED: Thu Sep  8 16:45:08 2022
NAMESPACE: jenkins
STATUS: deployed
REVISION: 1
NOTES:
1. Get your 'admin' user password by running:
  kubectl exec --namespace jenkins -it svc/jenkins -c jenkins -- /bin/cat /run/secrets/additional/chart-admin-password && echo
2. Get the Jenkins URL to visit by running these commands in the same shell:
  export NODE_PORT=$(kubectl get --namespace jenkins -o jsonpath="{.spec.ports[0].nodePort}" services jenkins)
  export NODE_IP=$(kubectl get nodes --namespace jenkins -o jsonpath="{.items[0].status.addresses[0].address}")
  echo http://$NODE_IP:$NODE_PORT/login

3. Login with the password from step 1 and the username: admin
4. Configure security realm and authorization strategy
5. Use Jenkins Configuration as Code by specifying configScripts in your values.yaml file, see documentation: http:///configuration-as-code and examples: https://github.com/jenkinsci/configuration-as-code-plugin/tree/master/demos

For more information on running Jenkins on Kubernetes, visit:
https://cloud.google.com/solutions/jenkins-on-container-engine

For more information about Jenkins Configuration as Code, visit:
https://jenkins.io/projects/jcasc/


NOTE: Consider using a custom image with pre-installed plugins
Jenkins 관리자 암호
# jsonpath="{.data.jenkins-admin-password}"
# secret=$(kubectl get secret -n jenkins jenkins -o jsonpath=$jsonpath)
# echo $(echo $secret | base64 --decode)
이제 NodePort 로 브라우저를 통해 접속해보자.


설치 후 Plugin 업데이트를 진행하여 Kubernetes 및 Pipeline plugin 을 설치하자. ( Kubernetes Plugin 만 별도로 설치해도 된다. )

Build
이제 Git 소스로부터 Container Image를 만드는 과정을 살펴보자.
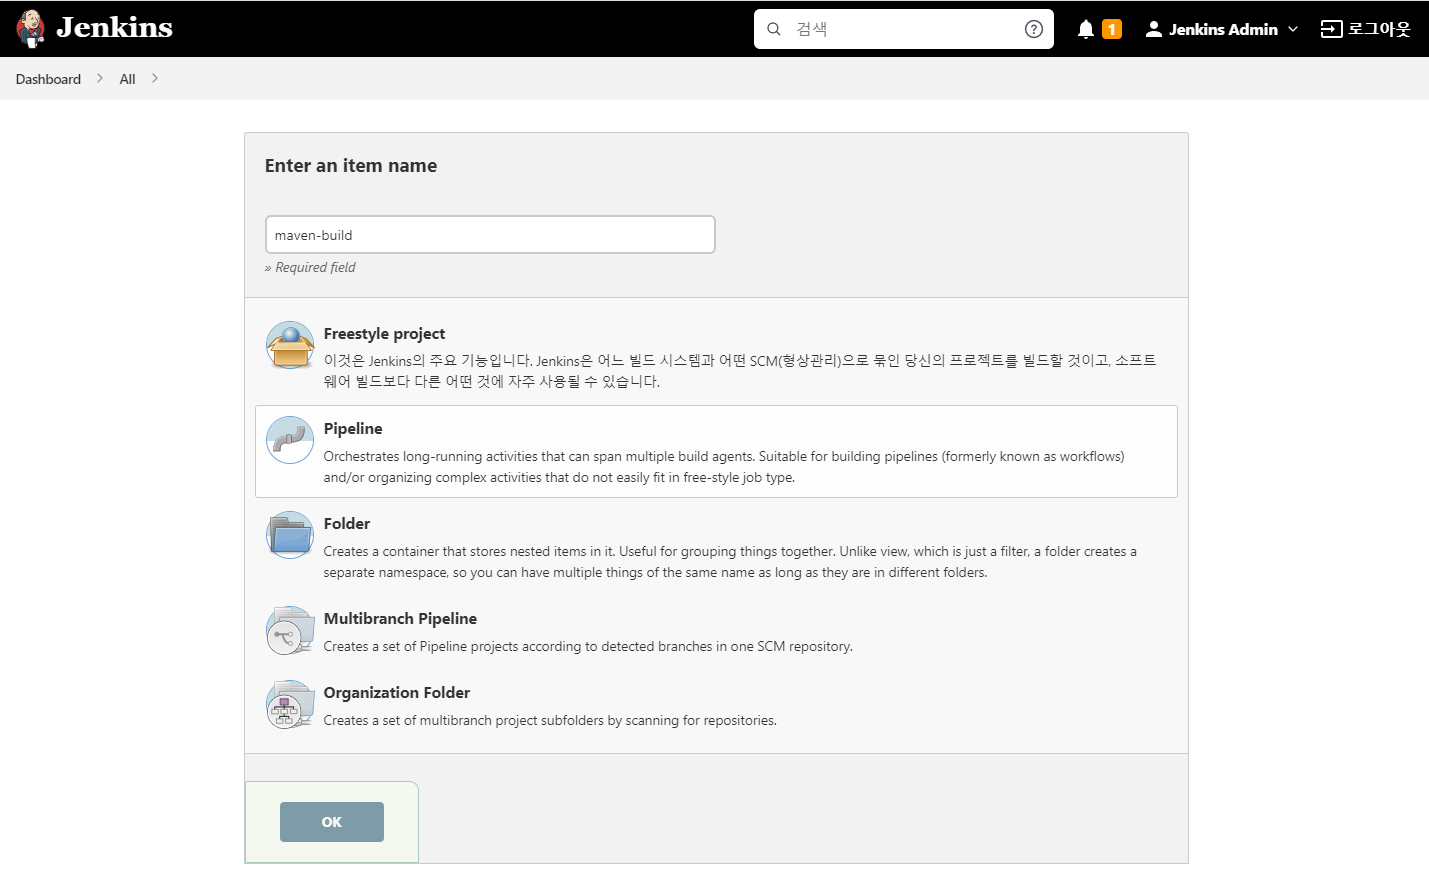
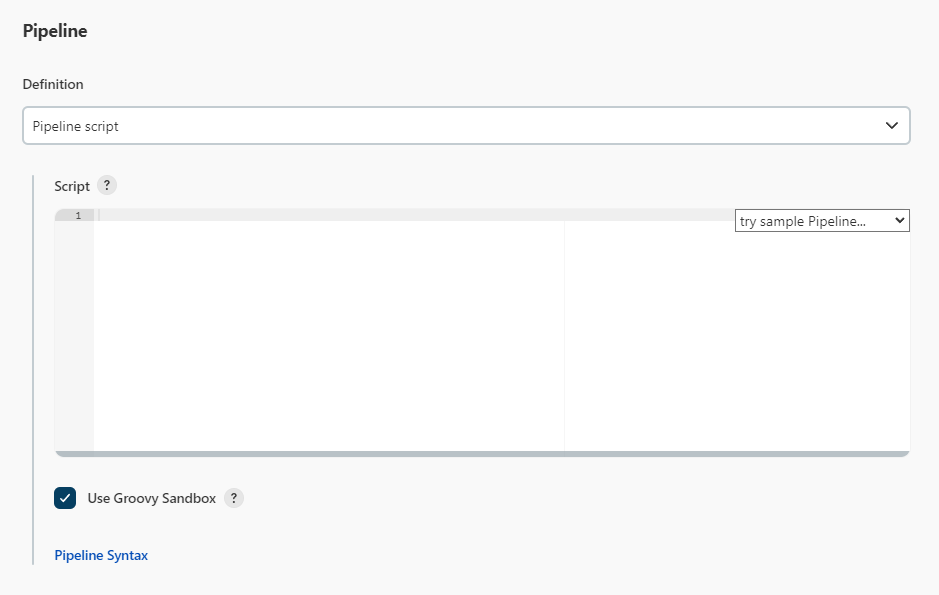
파이프라인 Script 를 작성하기 전에 현재 Kubernetes 환경이 Docker engine없이 containerd 만 설치되어 있어 docker build 대신 Kaniko로 빌드를 진행하도록 한다. 이 때 Kaniko에서 사용할 Credential을 위해 secret을 먼저 생성하자. ( jenkins에서 만든 이미지를 Dockerhub에 저장하기 위한 계정정보이다. )
kubectl create -n jenkins secret docker-registry docker-credentials \
    --docker-username=kmaster8  \
    --docker-password='<password>'
다음과 같이 pipeline을 생성한다.
pipeline {
  environment {
    registryCredential = "docker"
  }

    agent {
        kubernetes {
            yaml """
apiVersion: v1
kind: Pod
metadata:
  labels:
    jenkins-build: app-build
    some-label: "build-app-${BUILD_NUMBER}"
spec:
  containers:
  - name: kaniko
    image: gcr.io/kaniko-project/executor:v1.5.1-debug
    imagePullPolicy: IfNotPresent
    command:
    - /busybox/cat
    tty: true
    volumeMounts:
      - name: jenkins-docker-cfg
        mountPath: /kaniko/.docker
  volumes:
  - name: jenkins-docker-cfg
    projected:
      sources:
      - secret:
          name: docker-credentials
          items:
            - key: .dockerconfigjson
              path: config.json
"""
        }
    }


  stages {
    stage('Checkout') {
      steps {
        script {
          git url: 'https://github.com/kmaster8/flask-helloworld.git', credentialsId: ''
          sh 'ls -la'
        }
      }
    }

    stage('build') {
        steps {
            container('kaniko') {
            sh '/kaniko/executor --context `pwd` \
               --destination docker.io/kmaster8/helloworld:2.0 \
               --insecure \
               --skip-tls-verify  \
               --cleanup \
               --dockerfile Dockerfile \
               --verbosity debug'
            }
        }
    }
  }
}
이제 build를 시작하면 dockerhub에 다음과 같이 이미지가 저장되는 것을 확인할 수 있다.

이제 이미지를 배포하였기 때문에 해당 이미지를 Kubernetes에 배포하는 CD과정을 진행해 보자. CD 과정은 ArgoCD 같은 GitOps 도구를 사용할 수 있지만, 여기서는 Jenkins에서 모두 배포까지 진행하는 과정으로 테스트해보자.
Jenkins에서 Kubernetes 에 Yaml을 배포하기 위한 몇가지 방법 중 Continuous Deployment 플러그인을 통해 배포하는 방법을 살펴보자.
우선 Kubernetes는 RBAC 모드로 대부분 운영된다. 그래서 배포를 위해서는 각 권한에 맞는 사용자의 Token ( Service Account ) 값이 필요하다. 이를 Jenkins에 등록하여야 한다.

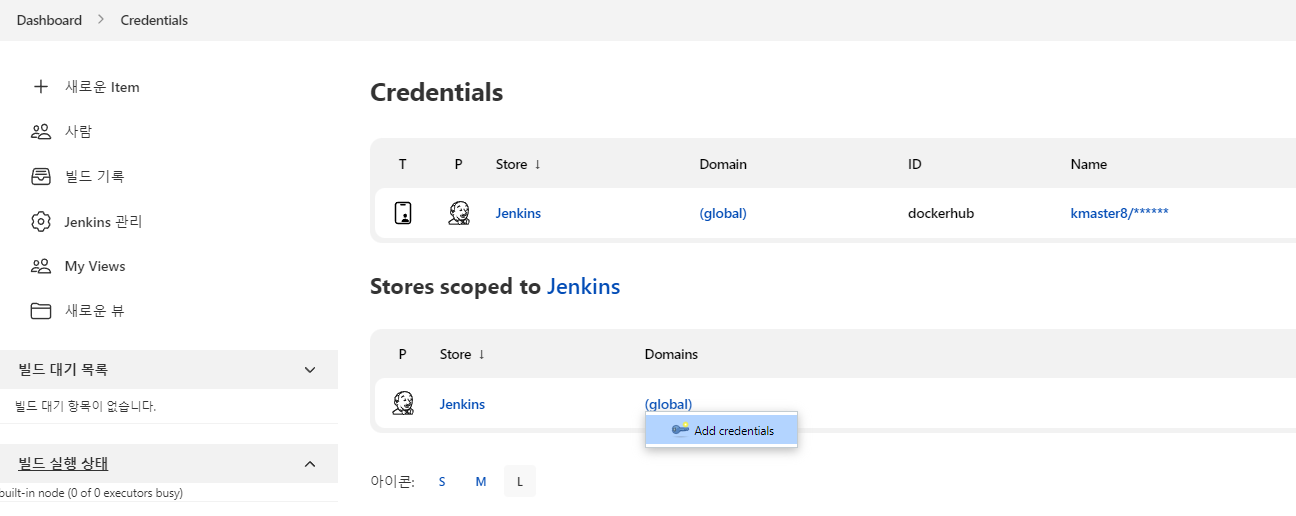
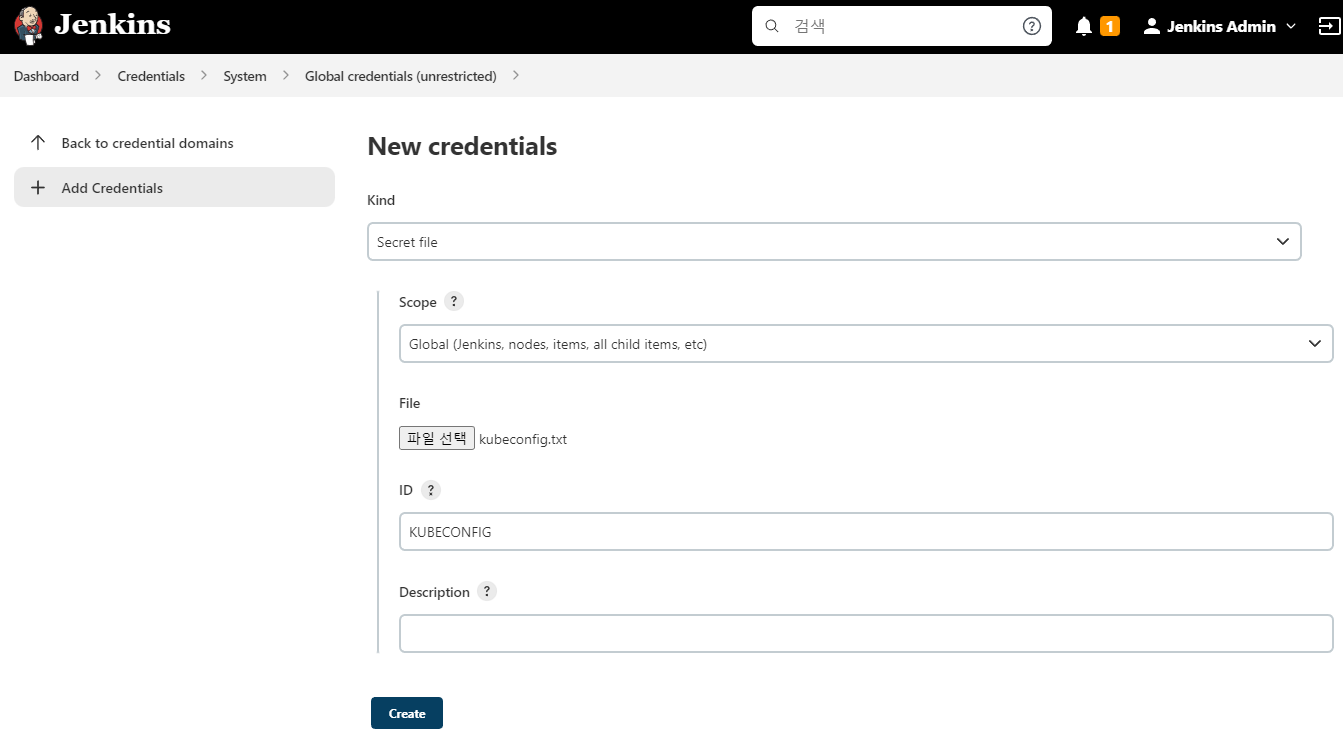
그리고, Kubernetes CLI Plugin을 설치한다.

이제 위의 Pipeline에 다음을 추가한다.
...
  containers:
  - name: kubectl
    image: gcr.io/cloud-builders/kubectl
    command:
    - cat
    tty: true
  - name: kaniko


...

    stage('deploy') {
      steps {
        script {
          withKubeConfig([credentialsId: 'KUBECONFIG', serverUrl: 'https://kubernetes.default', namespace: 'test']) {
            container('kubectl') {
              sh 'kubectl apply -f deploy.yaml'
            }
          }
        }
      }
    }

...
deploy.yaml은 다음과 같다.
apiVersion: apps/v1
kind: Deployment
metadata:
  name: hello
  labels:
    app: hello
spec:
  replicas: 1
  selector:
    matchLabels:
      app: hello
  template:
    metadata:
      labels:
        app: hello
    spec:
      containers:
      - name: hello
        image: docker.io/kmaster8/helloworld:2.0
        imagePullPolicy: Always
        ports:
        - containerPort: 5000

---

apiVersion: v1
kind: Service
metadata:
  name: hello
  labels:
    app: hello
spec:
  type: NodePort
  ports:
  - port: 5000
    targetPort: 5000
    nodePort: 30050
    protocol: TCP
    name: http
  selector:
    app: hello
이제 빌드를 수행하면 다음과 같이 deployment가 배포된 것을 볼 수 있다.
# k get svc,pod -n test
NAME                 TYPE        CLUSTER-IP      EXTERNAL-IP   PORT(S)          AGE
service/hello        NodePort    10.100.0.30     <none>        5000:30050/TCP   2m

NAME                              READY   STATUS    RESTARTS   AGE
pod/hello-84695987b6-l2rkh        1/1     Running   0          2m
참고
https://www.jenkins.io/doc/book/installing/kubernetes/
Kubernetes
This section describes how to use a set of YAML (Yet Another Markup Language) files to install Jenkins on a Kubernetes cluster. The YAML files are easily tracked, edited, and can be reused indefinitely. Create Jenkins deployment file Copy the contents here
www.jenkins.io
'Kubernetes > devops' 카테고리의 다른 글
| Tekton을 이용한 CI/CD (0) | 2022.09.12 |
|---|---|
| Jenkins와 Keycloak을 이용한 OIDC 연동 (0) | 2022.09.10 |
| Nginx Ingress를 통해 Canary 배포 설정 (0) | 2022.09.04 |
| Keptn (활용) (0) | 2022.08.04 |
| Ketpn (설치) (0) | 2022.07.28 |


